
티스토리 뷰
React _ API를 사용하여 외부 데이터 받아오기
1. DI (Dependency Injection)
DI란?
의존성 주입이라고 불리며, 의존하는 객체를 분리하여 주입한다.
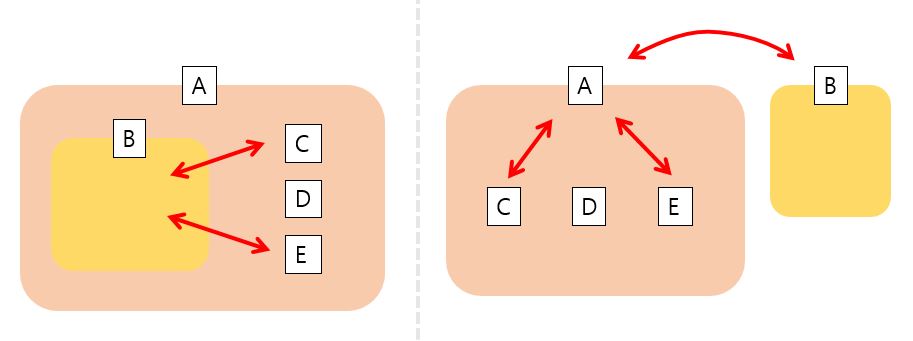
기존에 a의 내부에 있는 b는 c,e 등에 관계 의존성을 가지고 있다.
하지만, 의존성주입을 사용하여 b를 a로 부터 분리하여 주입하면(의존관계 역전, 의존성의 분리) c,e는 a에 주입된 b와 관계성이 형성되므로 b자체 보다는 a와의 관계에 신경쓰면 된다.
DI의 장점 (기능 단위로 분리된다)
-
테스트가 용이하다
-
코드의 재사용성을 높여준다
-
객체 간 결합도를 줄여준다
-
가독성이 좋아진다
활용
외부와 통신하는 API를 연결할 때, 그 역할만 수행하는 클래스를 생성하여 따로 관리가 가능하다. 따라서, 여러 API를 추가하거나, 수정시 분리되어 있어 유연한 활용이 가능하다.
아래의 예시와 같이 const youtube = new Youtube(); 의 형식으로 전달이 가능하다.
2. Comparison - Fetch & Axios
XMLHttpRequest
XMLHttpRequest는 fetch를 사용하기 이전에 주로 사용되었던 방식이며, 서버와 상호작용 하기위해 사용된다. XML뿐만 아니라 모든 형태의 데이터를 받아오는 것이 가능하다. 하지만, 각각의 단게별로 어떻게 데이터를 받아오고 처리해줄 건지 이벤트 기반으로 설정하여 작성하여야 힌다. MDN 문서 참고
const xhr = newXMLHttpRequest();

xhr.open("GET", "http://domain/service");

// request state change event

xhr.onreadystatechange = function () {
    // request completed?
    if (xhr.readyState !== 4) {
        return;
    }
    if (xhr.status === 200) {
        // request successful - show response
        console.log(xhr.responseText);
    } else {
        // request error
        console.log("HTTP error", xhr.status, xhr.statusText);
    }
};

// start request
xhr.send();
이벤트 기반으로 설정을 해줘야 했기에 가독성이 좋지 않았고, 단계별로 처리가 필요했다. 그에 비에 fetch는 Promise로 반환하여 then, catch의 메서드 체이닝으로 간단한 작성이 가능하다. 다만, 네트워크 상태코드가 404,500이더라도 resolve로 반환하며, 네트워크 장애 발생시에만 reject 로 반환한다. XMLHttpRequest는 거의 사용되지 않으며 기본 내장 함수인 fetch()가 사용되고 있다.
아래의 예시는 기본 내장함수인 fetch와 라이브러리인 Axios 두가지 방법으로 youtube 클래스를 만들어 App 컴포넌트에 프롭으로 전달하는 방식으로 작성하였다.
App 컴포넌트에서 url을 받아올 수 있지만, 받아오는 로직을 분리하여 App에 넣어줌으로써(DI) 기능단위로 분리된 코드작성이 가능하다.
Fetch
자바스크립트의 내장함수로 서버에 데이터를 호출, 요청하는 함수로 비동기적으로 promise로 반환한다.
src/service/youtube.js
class Youtube {
  constructor(key) {
    this.key = key;
    this.getRequestOptions = {
      method: "GET",
      redirect: "follow",
    };
  }
  //youtube Class 내부에 비동기 메서드를 생성
  //가장 유명한 동영상을 받아오는 url
  async mostPopular() {
    const response = await fetch(
      `https://www.googleapis.com/youtube/v3/videos?part=snippet&chart=mostPopular&maxResults=25&key=${this.key}`,
      this.getRequestOptions
    );
    //response를 json으로 변환
    const result = await response.json();
    return result.items;
  }
  //검색한 동영상을 받아오는 url
  async search(query) {
    const response = await fetch(
      `https://www.googleapis.com/youtube/v3/search?part=snippet&maxResults=25&q=${query}&type=video&key=${this.key}`,
      this.getRequestOptions
    );
    const result = await response.json();
    return result.items.map((item) => ({ ...item, id: item.id.videoId }));
  }
}
export default Youtube;
src/index.js
//youtube 객체 생성하여 App 컴포넌트에 youtube prop으로 전달
//App의 컴포넌트에서 메서드를 사용하여 youtube url을 받아올 수 있다.
const youtube = new Youtube(process.env.REACT_APP_YOUTUBE_API_KEY);
ReactDOM.render(
  <React.StrictMode>
    <App youtube={youtube} />
  </React.StrictMode>,
  document.getElementById("root")
);
Axios
API를 불러올 수 있는 라이브러리로 params 단위로 분리하여 key : value의 형태로 작성할 수 있어 코드 가독성이 좋다.
src/service/youtube.js
class Youtube {
  //httpClient으로 공통적으로 사용되는 baseUrl, key정보를 받아옴
  constructor(httpClient) {
    this.youtube = httpClient;
  }

  async mostPopular() {
    //비교 https://www.googleapis.com/youtube/v3/videos?part=snippet&chart=mostPopular&maxResults=25&key=${this.key}
    const response = await this.youtube.get("videos", {
      params: {
        part: "snippet",
        chart: "mostPopular",
        maxResults: 25,
      },
    });
    return response.data.items;
  }
  async search(query) {
    //비교 https://www.googleapis.com/youtube/v3/search?part=snippet&maxResults=25&q=${query}&type=video&key=${this.key}
    const response = await this.youtube.get("search", {
      params: {
        part: "snippet",
        maxResults: 25,
        q: query,
        type: "video",
      },
    });
    return response.data.items.map((item) => ({
      ...item,
      id: item.id.videoId,
    }));
  }
}
export default Youtube;
src/index.js
const httpClient = axios.create({
  baseURL: "https://www.googleapis.com/youtube/v3",
  params: { key: process.env.REACT_APP_YOUTUBE_API_KEY },
});
const youtube = new Youtube(httpClient);
ReactDOM.render(
  <React.StrictMode>
    <App youtube={youtube} />
  </React.StrictMode>,
  document.getElementById("root")
추가 참고사항
다른 곳에 사용된 예시지만 DI의 다른 예시여서 참고삼아 작성하였습니다. 아래와 같이 DI를 해줄때, 인스턴스(imageUploader)만 prop으로 넘겨줄 수 있는 것이 아니라 component의 형태도 prop으로 전달이 가능합니다. <ImageFileInput />이라는 component가 사용되어야 할 곳에 기본 prop값으로 imageUploader라는 클래스를 주입시킨 <FileInput/> 컴포넌트를 넣어줄 수 있다. 이때 const FileInput = <ImageFileInput imageUploader={imageUploader} />로 작성하지 않고 prop를 받아 넣어주는 것은 추후 FileInput에 추가적으로 할당될 prop의 적용이 가능하도록 확장성을 위해서 입니다. 공부하는 중이지만, 컴포넌트 자체도 prop으로 넘겨줄 수 있다는 것을 처음 알게되서 추가로 넣어보았습니다.
src/index.js
const authService = new AuthService();
//ImageUploader는 이미지 파일을 업로드 가능한 API를 연결한 클래스입니다
const imageUploader = new ImageUploader();
//확장성을 위해 props로 받고 전달함
const FileInput = (props) => (
  <ImageFileInput {...props} imageUploader={imageUploader} />
);
//component prop 인경우 보통 대문자로 전달함
ReactDOM.render(
  <React.StrictMode>
    <App authService={authService} FileInput={FileInput} />
  </React.StrictMode>,
  document.getElementById("root")
);
References
드림코딩 강의 내용을 바탕으로 작성하였습니다.
'Front-end > REACT' 카테고리의 다른 글
| React 성능 개선 방법, Shallow and Deep Comparison (0) | 2020.12.23 |
|---|---|
| React - LifeCycle and Hooks (0) | 2020.10.13 |
| 리액트의 기본개념과 사용법 (0) | 2020.10.01 |
- Total
- Today
- Yesterday
- DB
- Transaction
- TCP/IP
- 마스터즈코스
- 알고리즘
- Spring
- 회고
- javascript
- 학습로그
- 객체지향
- 우테코수업
- 카카오
- 개발공부일지
- 글쓰기미션
- JPA
- CS
- JS
- 코드스쿼드
- python
- 우아한테크코스
- React
- 내부코드
- java
- TIL
- 모의면접준비
- 월간회고
- 운영체제
- 인증
- OS
- 네트워크
| 일 | 월 | 화 | 수 | 목 | 금 | 토 |
|---|---|---|---|---|---|---|
| 1 | 2 | 3 | 4 | 5 | 6 | 7 |
| 8 | 9 | 10 | 11 | 12 | 13 | 14 |
| 15 | 16 | 17 | 18 | 19 | 20 | 21 |
| 22 | 23 | 24 | 25 | 26 | 27 | 28 |